

By understanding a little bit extra in regards to the 3D printing course of, and the way settings in MatterControl have an effect on extrusion, we may also help you cut back and even eradicate oozing and stringing out of your 3D prints. This must be part of the common upkeep and calibration program to your 3d printer.
Maybe the most typical query we get from new 3D printer homeowners is, “How do I eliminate oozing and stringing on my prints?”
Extruding thermoplastic is an advanced course of with dozens of variables in play. Nevertheless, understanding what causes oozing/stringing in your prints doesn’t should be that difficult.
What’s Retraction?
First, let’s begin with the most typical false impression about what retraction does and the way it works.
Fable – Retraction “sucks” filament again up by means of the new finish. So, the extra retraction you employ, the much less oozing you’ll get.
Truth – As soon as filament has melted within the “soften zone” of your sizzling finish, it can’t be retracted. Retraction doesn’t create detrimental strain. Sizzling ends will not be sealed/hermetic. In the event that they have been, then the detrimental strain would “suck” molten filament again up by means of the new finish. This may probably result in plenty of jams and different extrusion points, however this isn’t the case.
Take into consideration candle wax. If you happen to have been to place a small cylinder of wax right into a pool of melted candle wax after which pull it out, would the melted wax include it? In fact not. Whereas a small quantity of wax will persist with the cylinder whenever you take away it, it doesn’t pull the pool of molten wax up with it.
In the identical approach, the stable filament above the soften zone doesn’t retract the molten filament with it.
Okay, so if retraction doesn’t pull filament again up by means of the nozzle, what does it do?
The aim of retraction is just to alleviate strain from the soften zone in order that filament isn’t being pressured by means of the nozzle throughout non-print strikes.
What are the Finest Retraction Settings?
There’s loads of misinformation on the market about how a lot retraction you need to have. I’ve seen suggestions from .1mm all the way in which as much as 20mm. So what’s the right amount?
The correct quantity is the minimal quantity required to scale back probably the most stringing in your half. Some machines and sizzling ends require extra retraction than others, and every materials has totally different necessities. Generally, although, it’s unlikely you need to want greater than 5mm or lower than 1mm.
Settings to Tune
There are a number of different essential settings that have an effect on oozing/stringing on elements. We’ll undergo the method of adjusting your machine to get the least quantity of oozing doable, however it’s critically essential that you simply begin out with a correctly calibrated extruder. If you happen to haven’t calibrated your extruder earlier than, learn this earlier than you begin adjusting retraction settings.
There are solely 2 settings we’ll be adjusting for retraction on this article:
- Retraction: Size on Transfer
- Pace: Journey (pace for non-Print strikes)

There are actually different settings that have an effect on oozing, however these are crucial, and the simplest to check and regulate. We’ll cowl the opposite settings in a future article.
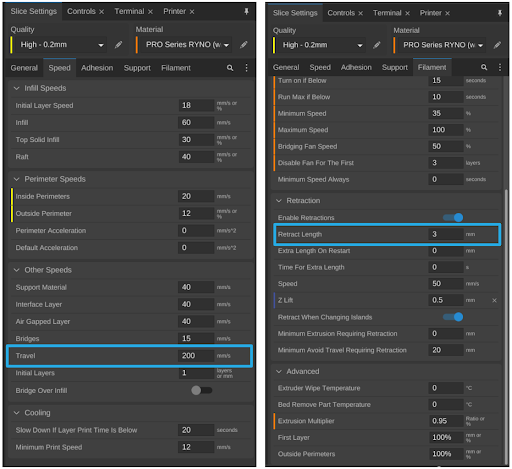
We created a easy STL (Obtain the file right here) to point out the results of various settings on oozing/stringing. They’re 10mm cubes and they’re spaced 10mm, 20mm, and 40mm aside. The take a look at machine was a SeeMeCNC Rostock Max with an E3D v6 sizzling finish. The filament used was MatterHackers commonplace blue PLA.
These settings have been used for all take a look at prints:
- Layer Peak: 0.25mm
- Infill: 25% – Triangle
- Perimeters: 2
- Stable Prime Layers: 2
- Stable Backside Layers: 2
- Infill and Perimeter Speeds: 40mm/s
- All elements have been printed with a skirt, however the skirt was eliminated for a few of the photos with a view to extra clearly visualize the oozing/stringing
Begin Dialing within the Settings
This print had 0 retraction and 40mm/s journey pace (non-print strikes). This represents in regards to the worst oozing/stringing doable on this machine
You’ll discover that the stringing between the 20 and 40mm gaps are a lot worse than the 10mm. That is just because there’s extra time for filament to ooze out of the new finish. That is why journey pace for non-print strikes performs an enormous half in oozing/stringing. The quicker you’re capable of transfer to the subsequent print place, the much less time there’s for filament to ooze from the new finish.
With this as the start line, the very first thing to do is to extend the journey pace of non-print strikes. Each machine has totally different limitations, however 150-250mm/s is the probably the vary your machine can deal with nicely. There actually received’t be a noticeable distinction in stringing between 150 and 250mm/s due to acceleration and different limits within the firmware, however that’s for an additional article.
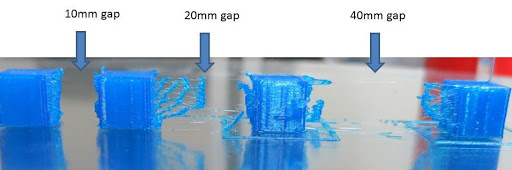
This print had 0 retraction, however the journey pace was elevated from 40mm/s to 150mm/s.
It’s higher than the earlier print, however clearly not acceptable.
As soon as the journey pace is about, we’ll improve the retraction distance. Once more, the purpose is to make use of the minimal quantity of retraction essential. Utilizing greater than essential may cause jams, blobs, and different extrusion associated points.
This print has 1mm retraction with 150mm/s journey pace:

There’s clear enchancment – particularly within the 10mm hole – however nonetheless loads of stringing between elements
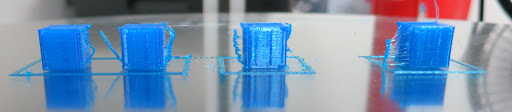
Subsequent, 2mm retraction, 150mm/s journey pace:
Nearly proper. There are a number of very, very superb strands of PLA which you’ll not even have the ability to see within the image, however the edges and faces are all very clear with no blobs or extra filament to talk of.
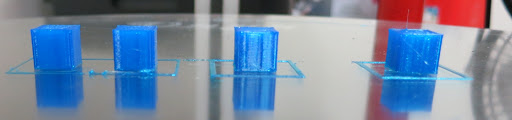
We’re not finished but, although. We’ll improve the retraction to 3mm to see if there’s any noticeable enchancment.
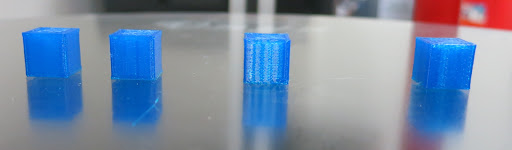
3mm retraction, 150mm/s journey pace
Excellent! No stringing, no oozing. Simply completely printed cubes.
So, it seems to be like 3mm is the correct quantity of retraction for PLA on this machine.
To rapidly and simply tune your settings to realize optimum retraction, obtain the dice retraction print right here, and print it together with your present settings.
Based mostly in your outcomes, regulate both the journey pace or the retraction distance and reprint. Solely change 1 setting at a time. That approach, you possibly can simply see the impact of every change.
Regulate your retraction distance up/down by both 0.5 or 1mm increments. We do not suggest distances larger than 5mm, or lower than 0.5mm.
Lastly, you might have to carry out this take a look at and regulate for various supplies. Some supplies might ooze greater than others, and will require elevated retraction distance & journey pace to realize the identical outcomes.
Comfortable Ooze-Free Printing!