

So, you’ve received your self a Radiomaster TX15? Nice selection. Now let’s be sure you set it up accurately and get probably the most out of it. On this tutorial, I’ll information you step-by-step by means of the radio setup course of and present you easy methods to configure the vital settings in EdgeTX. I’ll additionally share some helpful ideas and methods alongside the best way.


Nonetheless deciding whether or not the TX15 is best for you? Try my in-depth overview right here: https://oscarliang.com/radiomaster-tx15-max/
The radio I’ve right here is the TX15 Max Version. You probably have the Normal Version, that’s wonderful too—the setup course of is sort of similar. The radios are primarily the identical, with just some beauty and gimbal variations.
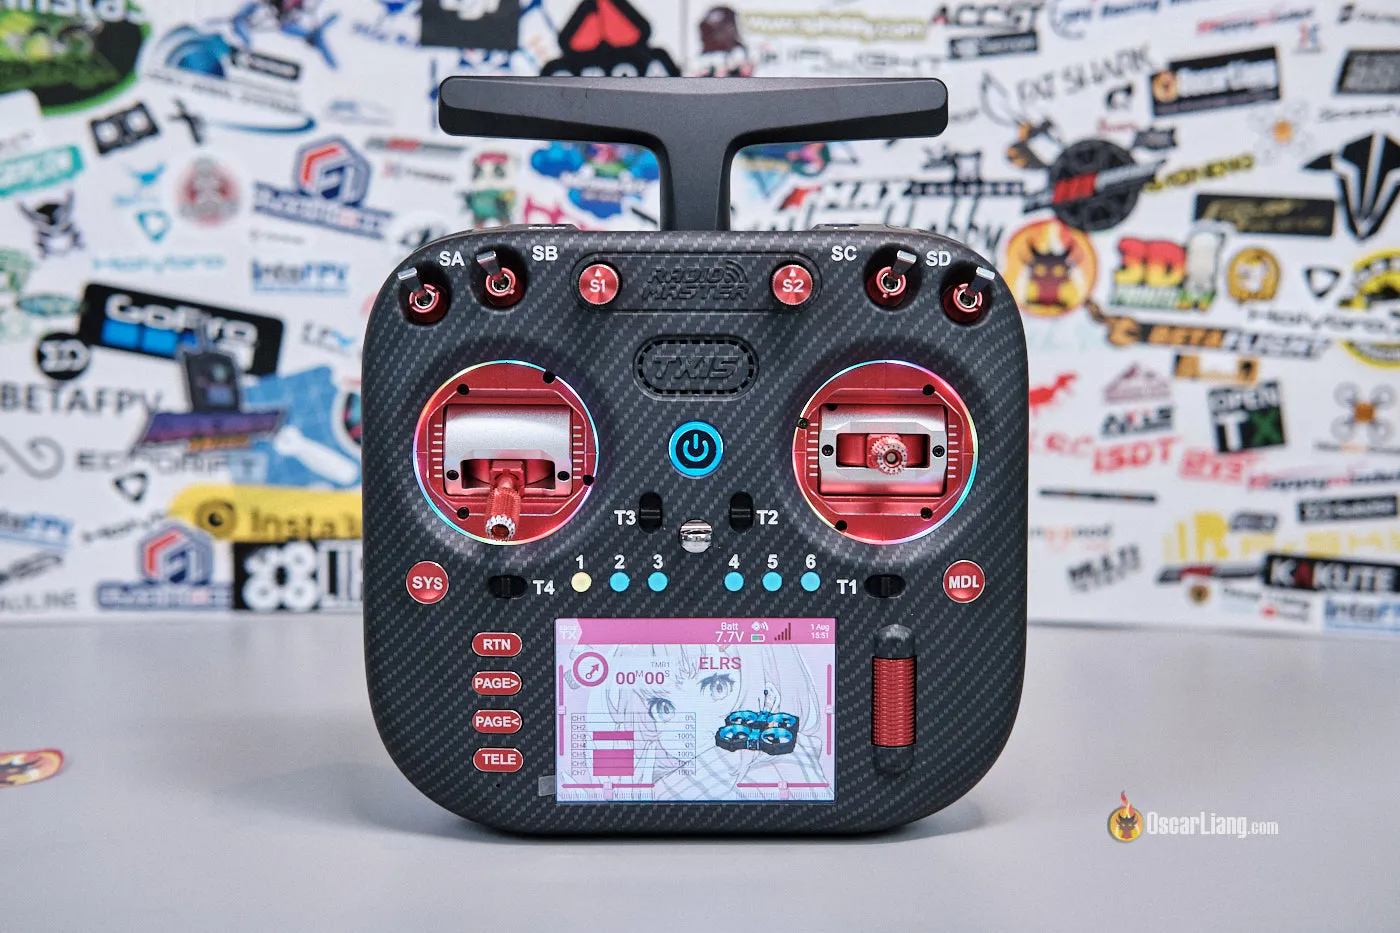
Understanding the Controls and Switches
Right here’s a diagram of all of the accessible controls, buttons, and switches. Familiarize your self with it so that you don’t get misplaced. 🙂

Battery Set up
To energy up your radio, you’ll want two 18650 Li-ion cells. The TX15 comes with a battery holder within the rear compartment that holds two 18650 Li-ion cells.

The batteries are usually not included, however they’re broadly accessible on-line. Listed below are my battery suggestions:
- RadioMaster 3200mah:
- Sanyo NCR18650GA:
- Molicel M35A:
- VTC6:
Potential Begin-up Warnings
To energy on, press and maintain the radio’s energy button for a few seconds.
Ideally, a model new radio ought to hearth up with none fuss. Nonetheless, in case your display flashes a warning, don’t panic. Right here’s a breakdown of potential alerts and what they imply:
- Throttle Warning: This pops up in case your throttle stick (the left one for Mode 2 radios) isn’t at its lowest place when powered on. Pushing all of it the best way down will do away with this warning.
- Change Warning (also called Management Warning): This indicators that some switches aren’t of their default positions. To clear this, guarantee all switches are of their HIGH place
- SD Card Warning: This means a model mismatch between the SD card content material and firmware. Should you get this warning, comply with this information to repair it.
You will get by means of a warning by merely urgent the Enter button (scroll wheel).
If every little thing goes effectively, you need to be greeted by the radio’s default house web page.
Radio Settings
The Radio Settings menu is the place you modify show, audio, and different system-related parameters.
To get there, press the SYS button. It will take you to the Apps web page. Then press the PAGE> button twice to get to the Radio Settings web page.

You may go away most radio settings at their default values, however listed below are a number of I all the time change when establishing a brand new radio:
1. Set Date & Time.
2. Sound
- Mode: Select All if you wish to hear beeps when navigating the menu. Alternatively, select Nokey should you want it quieter.
- Quantity: Most. You may modify the quantity utilizing the knob, and I’ll present you easy methods to set that up later.
- Beep quantity/size: Minimal

3. Alarm
- Battery low (that is the edge for audio and haptic warnings):
- For Li-ion battery: 6.2V
- For LiPo battery: 7.2V
- Should you fly long-range, you could need to set this larger so you’ve sufficient battery left to make it again house.
- Inactivity: 5 minutes (If the radio is left untouched for this lengthy, you’ll hear the inactivity alarm reminder).

4. Backlight
- Mode: Keys
- Inactivity timeout: 5s (The backlight turns off after this period of time if no buttons are pressed.)
- ON brightness: Most (You may modify display brightness utilizing a knob, and I’ll present you the way later on this information.)
- OFF brightness: Minimal
- Alarm: Enabled (Whenever you get a warning, the backlight activates mechanically.)
Why use Keys mode?
By default, each the sticks and buttons can activate the backlight, which is a bit pointless. You aren’t actually trying on the display whereas flying, so it simply wastes battery. By setting it to Keys, solely the menu buttons will activate the backlight, which helps save power.

5. Different settings:
- Splash display: 1s (This controls how lengthy the startup display stays on while you energy on the radio.)
- Startup Sound: OFF (I don’t need to hear “Welcome to EdgeTX” each day.)
- Energy Off Delay: 0.5s or 1s (You may shortly flip the radio off. It’s best to not set it to 0s, in case you unintentionally contact the ability button throughout flight.)
- USB mode: Ask


{Hardware} Settings
Go to the {Hardware} web page by urgent the PAGE> button 4 instances.
1. Battery meter vary:
- For Li-ion battery: 5.8V – 8.2V
- For LiPo battery: 6.6V – 8.2V
Why these ranges?
This setting controls the on-screen battery indicator, particularly when it exhibits as full or empty. When the radio powers on, there may be some voltage sag, so you’ll realistically by no means see 8.4V even when the batteries are absolutely charged. That’s the reason utilizing 8.2V as the utmost voltage, as an alternative of 8.4V, makes extra sense.Be aware that this isn’t the low-voltage alarm threshold. You set the low battery warning individually within the Alarm part underneath Radio Settings, as talked about earlier.
2. ADC Filter: OFF (Why? Learn this part. Solely allow it should you fly fixed-wing plane with out flight controllers.)

3. Inside RF
This part ought to already be configured accurately by default, however it’s all the time good to double-check.
For radios with an inside ExpressLRS RF module, use:
- Sort: CRSF
- Baudrate: 5.25M
Sooner baudrate = quicker communication between the RF module and the radio. However that doesn’t imply each radio assist larger baud charges, it relies on the RF module and radio functionality. In keeping with ExpressLRS Wiki, Radiomaster Inside ELRS module can deal with 5.25M baudrate. Should you’re experiencing fixed Telemetry Misplaced/Recovered even with the receiver close by and/or if the Lua Script fails to load correctly after growing baudrate, then it’s an indication your radio and/or module can not work on the chosen Baud Fee. Decrease it down a notch and take a look at once more.
Battery Voltage Calibration
To ensure your radio exhibits an correct battery studying, take a second to verify and calibrate the battery voltage.
Utilizing a digital multimeter, measure the voltage of the Li-ion batteries inside your radio.
Vital: Measure it whereas the radio is powered on.

Because the cells are linked in sequence, it’s best to anticipate a studying someplace between 6V and eight.4V. The purpose is to ensure the voltage proven in your multimeter matches the voltage displayed on the radio.
If the studying is off by greater than 0.05V, it’s best to calibrate it.
To calibrate the voltage, go to the {Hardware} web page, discover Battery Calibration, and enter the voltage proven in your multimeter.

Show Battery Voltage On House Display
To see the precise battery voltage of your radio at a look, add the voltage studying to the house display.
To do that:
- Go to UI Setup by urgent the TELE button
- Click on the primary icon on the highest bar, subsequent to 1
- Click on Setup widgets subsequent to High bar
- Click on on a sq. within the high bar so as to add a widget
- Choose Worth, then select Batt

Gimbal Rigidity Changes
To customise how stiff the sticks really feel, you possibly can modify the gimbal spring rigidity from the skin of the radio with out taking it aside. For these changes, you will want a 1.5mm hex screwdriver or Allen key.
Here’s a breakdown diagram of the AG02 gimbals, exhibiting the stress adjustment screws for roll, pitch, yaw, and throttle, in addition to the stick journey adjustment factors.
You probably have the usual Corridor gimbals, seek advice from the official information for directions.

Gimbal Calibration
Earlier than flying together with your brand-new radio, it’s best to all the time calibrate the gimbals, particularly after adjusting spring rigidity. You might also need to recalibrate them after updating EdgeTX firmware.
Go to the Radio Setup web page, then press PAGE> a number of instances till you attain the {Hardware} web page. Scroll down and discover the Calibration choice. It will begin the calibration course of for the sticks and sliders (knobs).
The on-screen directions are clear, so simply comply with them rigorously.

Ensure you solely transfer the sticks as proven on display. For the most effective outcomes, keep away from shifting the sticks in circles. Be as light as attainable when pushing the sticks to the top factors, so the radio can learn them precisely.

And don’t overlook to calibrate the knobs too.
Creating Fashions
I’ve a separate information that explains easy methods to create a mannequin profile to your quads step-by-step: https://oscarliang.com/create-new-model-profile-edgetx/
Personally, I want creating one profile for every radio hyperlink, after which binding that profile to all of my quads utilizing that hyperlink. It’s simply simpler that method when you’ve 10 or extra quads that you simply fly usually.

Methods to Entry ExpressLRS LUA Script
Within the ExpressLRS Lua script, you possibly can configure your radio hyperlink parameters.
To entry it:
- Press the SYS key
- Go to Apps
- Choose ExpressLRS

You often don’t want to alter these settings fairly often. For most individuals, it’s a set-it-and-forget-it form of factor. Nonetheless, it’s helpful to know the important thing settings:
- Packet price: Increased charges imply decrease latency however much less vary. Decrease charges imply extra vary however larger latency. I like to recommend 150Hz or 250Hz as a great steadiness.
- TX Energy: This relies on how far you intend to fly. 100mW to 250mW is sufficient for most individuals and is able to greater than a number of miles.
- WiFi Connectivity: Enables you to activate the module’s WiFi so you possibly can entry its WebUI out of your cellphone or laptop computer.
- Bind: Places the module into bind mode.
If you need a deeper dive into each setting, try my ExpressLRS tutorial: https://oscarliang.com/setup-expresslrs-2-4ghz/
Brightness & Quantity Adjustment Utilizing Knobs
In Particular Features, create a brand new perform for backlight management:
- Set off: ON
- Perform: Backlight
- Supply: S1
- Allow: checked
Then create one other perform for quantity management:
- Set off: ON
- Perform: Quantity
- Supply: S2
- Allow: checked

RGB LED (Gimbal Rings and Customizable Switches)
You may customise the RGB LED rings across the gimbals with completely different lighting patterns and strong colours, or flip it off.

To try this, go to World Features. You can even use Particular Features in order for you it to use solely to a selected mannequin profile.
- Create a brand new perform
- Set off: ON
- Perform: RGB leds
- Worth: [any lighting effect you want]
- Repeat: On
- Allow: checked.
That’s it.
Should you don’t need any LED in any respect, simply don’t add this international perform.

If you don’t use the flight mode buttons — the 6 buttons above the display — you possibly can disable them and have them show the identical lighting impact because the gimbal LED rings.
To try this, go to Mannequin Settings → Customizable Switches, and set the Sort of every change to None.

Backup/Restore Settings and Fashions
Information: https://oscarliang.com/backup-restore-models-radio-settings-edgetx/
EdgeTX Firmware Replace
Information: https://oscarliang.com/flash-edgetx/
Conclusion
I hope this information has been useful for establishing your Radiomaster TX15 radio. I’ll preserve updating it if I uncover extra helpful mods, settings, or upgrades for the TX15.